Where I grew up outside St. Louis, rabbits were the things that got into the garden. They were on Easter cards and in cartoons. Nobody I knew cooked one, and if a rabbit had shown up at a family dinner, somebody would have asked what happened to the chicken.
So it’s a little embarrassing that I’ve spent the last few falls in Wyoming breaking down deer and elk on my own cutting table and had still never cooked a rabbit until this year. It wasn’t squeamishness. After you’ve wrapped a few hundred pounds of shoulder roasts in butcher paper, a three-pound animal isn’t going to rattle you. Rabbit just never landed in front of me, and I never went looking.
Then one night in September I was scrolling the meat listings on Eat Wyoming, the online farmers’ market based here in Casper, and found rabbit from the Wyoming Rabbit Meatery. A producer in my own town. I’d had no idea. I ordered one, mostly to find out what I’d been skipping.
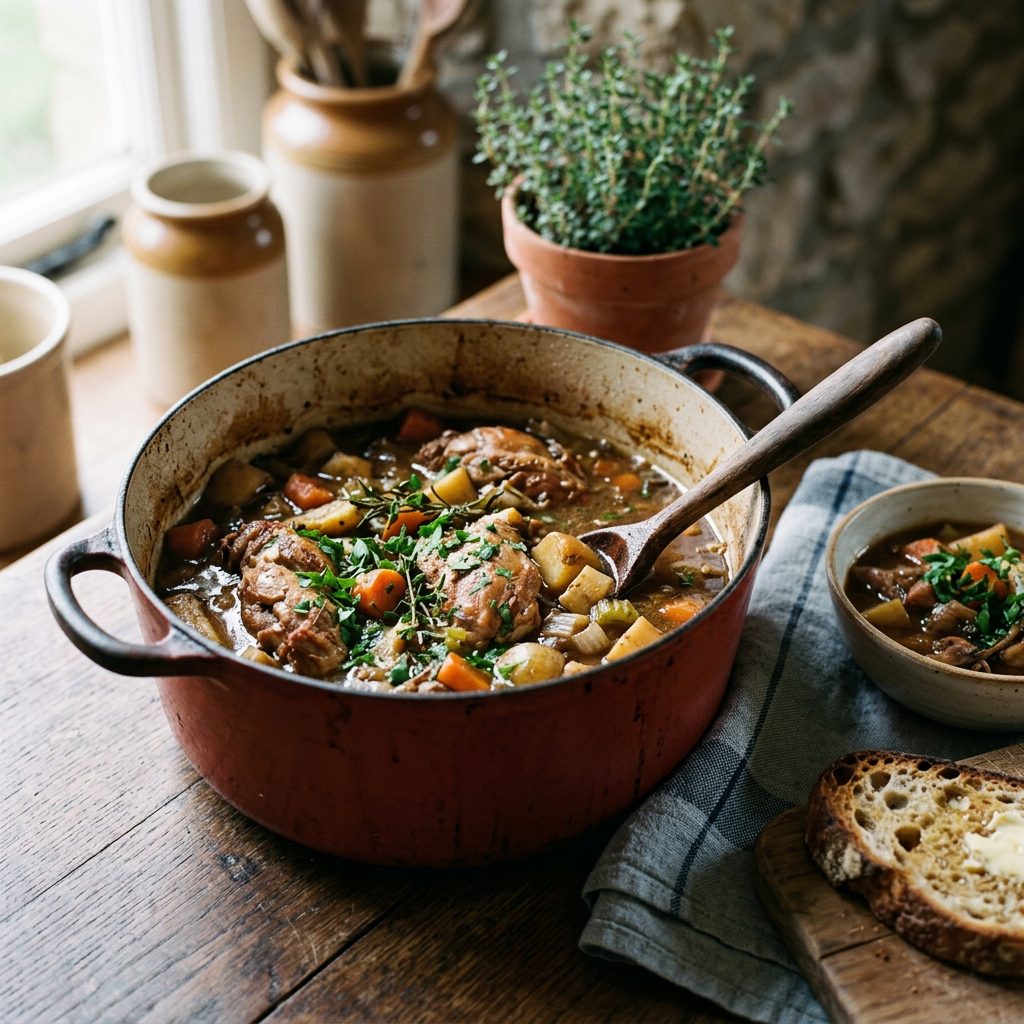
Turns out I’d been skipping a lot. That first rabbit went into the Dutch oven with bacon, white wine, mushrooms, and root vegetables, and came out as one of the better stews I’ve made since we moved here: a glossy sauce, legs sliding off the bone, and a flavor like a French farmhouse had wandered into central Wyoming. My five-year-old ate his over egg noodles and asked zero follow-up questions, which in our house is a five-star review. I’ve made it a few more times since, and this is the version I’ve settled on.
Where This Rabbit Came From (and Where It Didn’t)
This blog spends a lot of time on meat I packed out of the hills myself, so to be straight: I didn’t hunt this one. I bought it from somebody who raises rabbits for the table. The Meatery’s listing calls it “locally raised, ethically harvested rabbit meat.” Prices change, so I won’t quote one. Check the listing. One rabbit fed the three of us with some left over.
Buying local turned out to matter more than I expected. According to USDA’s Food Safety and Inspection Service, federal inspection of rabbit is voluntary, while for beef, pork, and chicken it’s required. That isn’t a reason to worry. It’s a reason to buy from someone you can actually talk to about how the rabbit was raised and processed. Try that with a foam tray.
Plenty of Wyoming hunters take their own, of course. Wyoming Game and Fish runs the cottontail season September 1 through March 31, with a daily bag limit of 10 and a possession limit of 20. Hunters 14 and older need a small game license. Resident kids 13 and under who’ve completed a certified hunter safety course can hunt cottontails without one. Check current regs before you go, not my blog. I haven’t chased cottontails myself yet, but this recipe works for wild rabbit too, with one adjustment noted below.
What You’re Working With
Everybody says rabbit tastes like chicken, and USDA more or less agrees, calling the meat “fine grained and mild flavored.” That undersells it a little. To me the hind legs are firmer and a touch sweeter than chicken thigh, and the loin along the backbone is pale and fine-textured, closer to pork tenderloin than chicken breast. Farm-raised rabbit isn’t gamey at all.
It’s Lean. Really Lean.
This is the thing to understand before you cook one. USDA’s nutrient data puts raw domestic rabbit at about 5½ grams of fat per 100 grams. Chicken with the skin on runs around 15. Skinless chicken meat is actually leaner on paper, around 3 grams, so “leaner than chicken” depends on which chicken you mean. But most of us cook chicken with skin and some fat to work with. Rabbit gives you no skin to baste the meat, no fat cap, and almost no marbling. Wild cottontail is leaner still, a little over 2 grams of fat per 100 grams in USDA’s numbers.
Lean meat is great to eat and unforgiving to cook. A few minutes too long and it goes dry and stringy, with nothing in the meat to cover for you. That fact shapes everything in this recipe.
On labels, USDA calls a young rabbit under 12 weeks (roughly 1½ to 3½ pounds) a fryer, and an older, bigger, firmer-fleshed one a roaster, which USDA says is best braised or stewed. This recipe is built around a 2½- to 3-pound rabbit. A roaster works too, with more time for the legs.
A Meat We Used to Eat
Rabbit wasn’t always this unusual here. The National Park Service notes that during World War II some families kept rabbits and chickens in their yards to stretch their meat rations, and Smithsonian magazine says most American home cooks had moved away from rabbit by the 1960s. My family just landed on the side of the century that forgot about it.
Why You Braise Rabbit
You can fry or roast rabbit. USDA says a young fryer can be cooked much like young poultry. But for a first rabbit, or a fifth, braising is the method that forgives you.
With dry heat, the thin loin cooks through long before the hind legs, which are the hardest-working muscles on the animal and carry the most connective tissue. You end up choosing between a perfect loin with tight legs, or tender legs with a sawdust loin. A braise keeps the meat partly submerged at a gentle simmer under a lid. The moisture protects the lean meat, the steady low heat gives the legs time to soften, and you get a finished sauce in the same pot.
If you’ve made my elk osso buco or my Dutch oven venison stew, the logic is the same: lean meat plus time and moisture equals tender. The difference is scale. An elk shank wants three-plus hours, and a rabbit takes closer to two. USDA says braising a cut-up rabbit takes about an hour to cook it. I go longer because I want the legs falling off the bone, not just done.
The Two-Stage Trick
This is the adjustment that made the biggest difference after my first try. The legs and the loin don’t want the same amount of time. The first time, everything went in together, and the legs were great while the loin came out dry and tight. Now the legs braise alone for an hour and fifteen minutes, and the saddle pieces go in for the last half hour or so. Everything finishes together: legs tender, loin just cooked and still juicy. It’s the same idea as my pheasant pot pie, where lean meat gets exactly as much heat as it needs and no more.
Breaking Down a Whole Rabbit
Some producers and butchers sell rabbit already cut up, so ask. If yours comes whole, it’s easier than a chicken and takes about ten minutes. You want two hind legs, two front legs, and the saddle in two or three chunks, plus the ribcage and belly flaps for the pot.
- Front legs. These aren’t attached by a ball joint. Pull a leg away from the body and slide your knife along the ribcage behind the shoulder blade, and it comes right off.
- Belly flaps. Trim off the thin flaps along the belly. They’re too thin to braise well on their own but add flavor.
- Hind legs. Cut through the meat along the pelvis, bend the leg back until the ball joint pops out of its socket, and cut through the joint.
- Ribcage. Cut crosswise through the backbone just behind the last rib. Shears make this easy. The ribcage has little meat, so it braises for flavor and comes out at the end.
- Saddle. Trim off the small pelvis section at the back, then cut the saddle crosswise into two or three pieces.
A boning knife handles the joints, and shears go through the backbone without drama. When you’re done, run your fingers over each piece and brush off any bone fragments. If your rabbit came with the liver and heart (USDA calls these the giblets), save them. I seared the liver in butter as a cook’s snack and didn’t tell anyone.
One note for parents: rabbit bones are small and some are sharp. I pick the meat off the bone before it goes in my son’s bowl. It takes thirty seconds and saves a lot of worry.
Browning and Building the Base
With a meat this mild, most of the flavor gets built in the first twenty minutes.
Dredge it. With no skin, the flour does the job skin would do. It helps build a crust and later thickens the sauce. Pat the pieces bone-dry, season, and dredge right before they hit the pot.
Start with bacon. Rabbit brings almost no fat, so you add some. Four ounces of thick-cut bacon, rendered slowly, gives you fat to sear in and salty, smoky bits for the finished stew.
Sear to golden, not mahogany. Small floured pieces brown fast. Aim for a deep golden crust, three to four minutes a side for the legs, with room between the pieces. The saddle just needs a quick sear now, since it finishes later.
White wine, not red. I used red the first time out of habit and it steamrolled the rabbit. A dry white keeps things bright and lets the meat taste like itself. A spoonful of Dijon in the braising liquid adds a sharp background note. Rabbit with mustard is a classic pairing in French cooking, and after one bite you’ll see why. Dry hard cider is a good swap for the wine.
Brown the mushrooms first, before the onions go in, so they sear instead of steam. Then give the onion, carrots, parsnips, and celery time to pick up color, and cook the tomato paste until it darkens. It won’t make the stew taste like tomato. It adds depth you’d miss if it weren’t there.
Mind the altitude. Casper sits a little over 5,000 feet, where water boils below 212°F, and USDA notes braised meat can need up to 25 percent more time at that elevation. The times below have cushion built in, but trust the fork over the clock.
Gear That Helps
Affiliate links. I earn a small commission at no extra cost to you.
- Lodge 6-quart enameled cast iron Dutch oven: fits a cut-up rabbit and vegetables with the lid closed, goes from stovetop to oven, and the enamel won’t react with the wine.
- Victorinox Fibrox Pro 6-inch curved boning knife: a narrow, semi-stiff blade for working around small joints.
- OXO Good Grips spring-loaded poultry shears: cuts through backbone and ribs a lot more safely than a cleaver on a small animal.
- ThermoPro TP15 instant-read thermometer: for confirming a safe temperature and checking leftovers.
Dutch Oven Rabbit Stew
Serves 4 | Prep 30 minutes | Cook about 2 hours
Ingredients
- 1 whole rabbit, 2½ to 3 pounds, cut into 2 hind legs, 2 front legs, and 2 to 3 saddle pieces, plus the ribcage and belly flaps
- 1½ teaspoons kosher salt, plus more to taste
- 1 teaspoon freshly ground black pepper
- ⅓ cup all-purpose flour
- 4 ounces thick-cut bacon, cut into ½-inch pieces
- 1 to 2 tablespoons olive oil, as needed
- 8 ounces cremini mushrooms, quartered
- 1 large yellow onion, diced
- 3 medium carrots, cut into 1-inch chunks
- 2 medium parsnips, peeled and cut into 1-inch chunks
- 2 celery ribs, sliced ½ inch thick
- 4 garlic cloves, smashed
- 1 tablespoon tomato paste
- 1 cup dry white wine (or dry hard cider)
- 2 cups low-sodium chicken stock, plus more as needed
- 1 tablespoon Dijon mustard
- 4 sprigs fresh thyme (or 1 teaspoon dried)
- 1 sprig fresh rosemary
- 2 bay leaves
- 1 teaspoon cider vinegar or fresh lemon juice
- 2 tablespoons chopped fresh parsley
- For serving: buttered egg noodles, mashed potatoes, or crusty bread
Instructions
- Heat the oven. Set a rack in the lower-middle position and heat the oven to 325°F.
- Season and dredge. Pat the rabbit pieces dry with paper towels and season all over with the salt and pepper. Right before searing, toss all the pieces in the flour and shake off the excess. Keep the saddle pieces on a separate plate from the legs.
- Render the bacon. Cook the bacon in a 5- to 6-quart Dutch oven over medium heat, stirring now and then, until crisp, 6 to 8 minutes. Move it to a paper-towel-lined plate with a slotted spoon and leave the fat in the pot. You want about 2 tablespoons of fat. Add olive oil if you’re short.
- Sear the legs. Raise the heat to medium-high. Add the hind and front legs in a single uncrowded layer, in two batches if needed. Sear without moving them until deep golden, 3 to 4 minutes, then turn and sear the other side 3 to 4 minutes more. Move to a plate.
- Sear the saddle. Add a little oil if the pot looks dry. Sear the saddle pieces 1½ to 2 minutes per side, just enough to color them. Move them to their own plate, cover, and refrigerate until needed.
- Brown the mushrooms. Lower the heat to medium. Add the mushrooms and a pinch of salt and cook, stirring occasionally, until they release their liquid and start to brown, 5 to 6 minutes.
- Cook the vegetables. Add the onion, carrots, parsnips, and celery. Cook, stirring and scraping the bottom, until the onion is soft and golden at the edges, 6 to 8 minutes. Add the garlic and tomato paste and stir constantly about 1 minute, until the paste darkens.
- Deglaze. Pour in the wine and scrape up every browned bit from the bottom of the pot. Simmer until reduced by about half, 3 to 4 minutes.
- Build the braise. Whisk the Dijon into the stock and pour it in. Add the thyme, rosemary, bay leaves, and cooked bacon. Nestle in the legs, ribcage, and belly flaps along with any juices from their plate. The liquid should come about two-thirds of the way up the legs. Add more stock if it doesn’t.
- Braise the legs. Bring to a simmer on the stovetop, cover, and move to the oven. Braise 1 hour 15 minutes. You want a lazy simmer, not a boil. If it’s bubbling hard, lower the oven to 300°F.
- Add the saddle. Take out the pot and tuck the saddle pieces into the liquid between the legs. Cover and return to the oven for 30 to 40 minutes more, until the hind-leg meat pulls easily from the bone with a fork. At higher elevations, allow an extra 15 to 20 minutes.
- Check the temperature. Insert an instant-read thermometer into the thickest part of a hind leg, not touching bone, and into a saddle piece. Both should read at least 160°F.
- Finish the sauce. Remove and discard the ribcage, belly flaps, bay leaves, and herb stems. If the sauce is thin, move the rabbit to a plate, simmer the sauce uncovered on the stovetop 5 to 10 minutes, then return the rabbit. Stir in the vinegar or lemon juice, then taste and adjust the salt.
- Rest and serve. Let the stew rest off the heat 10 minutes. Scatter the parsley over the top and serve over egg noodles or mashed potatoes, with bread for the sauce.
Food Safety and Knowing When It’s Done
USDA’s safe minimum internal temperature for rabbit is 160°F, checked with a food thermometer. That’s higher than the 145°F for whole cuts of beef or pork, so don’t bring your steak habits here. Check the thickest part of a hind leg, since it’s the last spot to get there, and keep the probe off the bone.
In a braise, 160°F is a floor, not a finish line. The rabbit will pass it long before the legs are tender. A hind leg at 160°F is safe, but it’s still tight, because the connective tissue hasn’t had time to soften. Doneness here is about texture. Twist a fork in the thickest part of a hind leg. If the meat pulls cleanly off the bone, you’re done. If it holds on, it isn’t overcooked. It needs more time. Cover it and check again in 15 minutes.
The saddle is the opposite. It’s the piece that can overcook, which is why it goes in late. If it comes out a little dry anyway, pull the meat off, stir it into the sauce, and nobody will know.
What to Serve With It
Buttered egg noodles are my first pick. Wide noodles hold the sauce, and they’re the side my kid gets excited about, which counts for a lot on a weeknight. Mashed potatoes are a close second. Soft polenta works if you want to lean Italian.
Put bread on the table too, because there’s always more sauce than you think. My Dutch oven sourdough is right for the job, if you own two Dutch ovens and some ambition. A salad with a mustardy vinaigrette cuts the richness, and the rest of that white wine goes in your glass.
If you’re cooking wild cottontail: wild rabbit is leaner, and wild cottontails tend to run smaller than a farm fryer, so weigh what you have and aim for 2½ to 3 pounds of bone-in rabbit total. Wild rabbits can also be older and tougher, so plan on extra time for the legs, and check for shot as you break them down.
Storage and Reheating
Cool it quickly. USDA says to refrigerate cooked rabbit within two hours. Don’t put the whole Dutch oven in the fridge, because the middle of a heavy pot cools slowly. Split the stew into shallow containers.
Keep the meat in the sauce. This is the big one. Store the rabbit fully covered in its braising liquid, which protects it in the fridge and again when you reheat. If you’ll have a lot of leftovers, pull the meat off the bones first. It takes up less room and reheats more evenly.
Refrigerator: 3 to 4 days in airtight containers, per USDA. The sauce will set up thick in the fridge and loosen as soon as it’s warm.
Freezer: USDA recommends using frozen cooked rabbit within 4 to 6 months for best quality. Freeze it with plenty of sauce and as little air as possible, and thaw it overnight in the fridge.
Reheating: Warm it slowly in a covered saucepan over medium-low heat with a splash of stock, stirring now and then, until it reaches 165°F throughout, which is USDA’s number for leftovers. For the microwave, cover the bowl, use medium power, stir halfway through, and check a few spots for cold pockets. High heat tightens lean meat faster than anything.
Second-day ideas: Shredded rabbit in its sauce, tossed with wide pasta and parmesan, might beat the stew itself. It also makes an excellent pot pie filling. Borrow the crust method from my pheasant pot pie.
The biggest thing my first rabbit taught me wasn’t technique. It was that a lot of what I “didn’t eat” was just stuff nobody had ever put in front of me. If you’re in the same spot, look up a local producer and try it. Something good might have been raised a few miles from your house this whole time.
If you make this, tag @wyofood on Instagram or Facebook. I want to see your pot. And if you’re a cottontail hunter with opinions on how I should cook a wild one, I’m listening.
— Sean