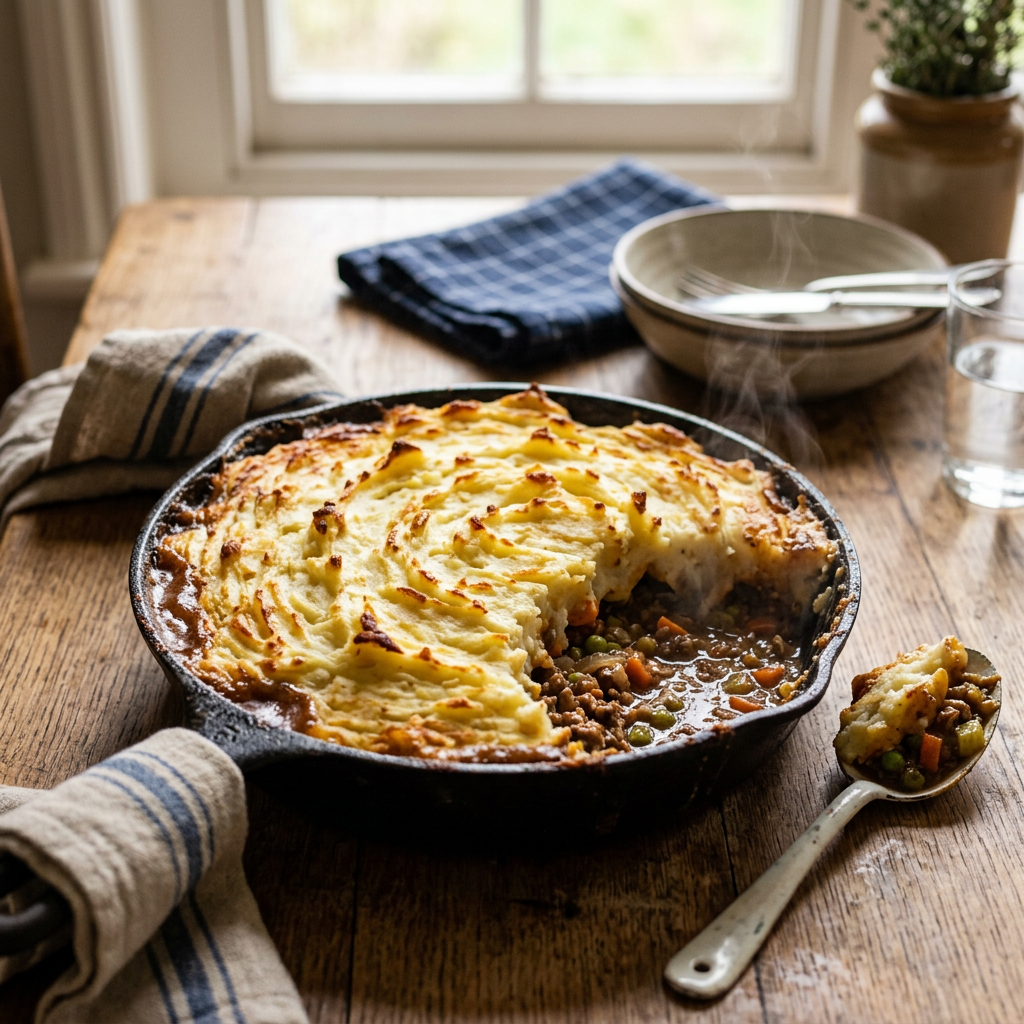
Some dishes you just eat. Others make you work a little, and I think the work is part of why they’re good. Shepherd’s pie is one of those. You bring the dish to the table, and the top is golden, with little ridges that went dark and crispy in the oven. Under it, gravy is bubbling up around the edges. Then you push a big spoon through the crust and the steam comes out. That first scoop is my favorite moment in casserole cooking, and I won’t hear otherwise.
This one also fixes a problem a lot of Wyoming freezers have. If you have antelope in the freezer, from your own hunt or a friend’s, there’s a decent chance a good chunk of it is ground. The backstraps go first. The roasts get used eventually. Then you’re left with all those one- and two-pound packages of ground pronghorn, and you start asking what to do with them besides another round of tacos.
Antelope shepherd’s pie is my answer to that. A savory, well-seasoned filling, real gravy, vegetables, and a thick layer of buttery mashed potatoes baked until the top is browned. It’s hearty without being heavy, it reheats well, and it’s a great way to put lean game on the table for people who aren’t sure they like game.
Shepherd’s Pie or Cottage Pie? (Technically, Neither)
Before anybody writes in: yes, I know. If you’re strict about it, shepherd’s pie is made with lamb (shepherds, sheep, you get it) and cottage pie is the version made with beef. Plenty of cooks hold to that line, and it’s a fine rule.
The history is a little less tidy, though. Food-history sources I found say the name “shepherd’s pie” shows up in print around the middle of the 1800s, but they don’t agree on an exact date. And they note that for a long stretch, home cooks used “cottage pie” and “shepherd’s pie” pretty interchangeably. The strict lamb-only rule may be more of a modern convention than an ancient law. The usual explanation for how the split happened is economic: lamb and mutton were the cheaper, more common meat in some places (Ireland is the usual example), while beef was more common in others (England). That’s the story you’ll see repeated most often. I’d treat it as a good explanation, not settled fact.
So what do you call it when the meat is pronghorn? Technically it’s neither. There’s no antelope in the official rulebook. I call it shepherd’s pie because that’s what most people call any baked meat-and-mashed-potato casserole. Call it whatever you want. Just make it.
Working With Ground Antelope
I didn’t grow up around any of this. My people bought jam at the store. Before we moved to Casper in 2022, my idea of game meat was something I’d heard about secondhand. Since then I’ve cooked a lot of wild game and processed my own deer, and the biggest thing I’ve learned about ground antelope is simple: it’s lean. Really lean.
Pronghorn is generally known as one of the leaner red meats you can put in a pan. How much fat ends up in the grind depends on who processed it and whether they added any, so check your packages if they’re labeled. Lean meat isn’t a problem. It just means you have to make a couple of adjustments that a pound of 80/20 beef would handle on its own.
Add a Little Fat
Ground antelope dumped into a dry pan tends to stick, steam, and turn gray before it ever browns. The fix is easy: give it some fat to work with. I like to start with a couple tablespoons of bacon fat, because it adds a little smoky depth, but neutral oil or butter works too. If your grind is extremely lean and you want a richer filling, you can also swap some of the antelope for ground pork or fattier ground beef. That’s an old wild-game trick, and I talk about it more in my Wyoming Elk Meatloaf, where fat and moisture matter even more.
Brown It, Don’t Boil It
Use a big, heavy pan, get it hot, and give the meat room. If you crowd 2 pounds of cold ground meat into a small skillet, the moisture has nowhere to go and you end up simmering it. I brown it in two batches, or I spread it out in my widest pan and leave it alone for a few minutes before breaking it up. Those brown bits on the bottom of the pan are flavor, and the gravy will pick them up later.
Season to Support It, Not Hide It
Some people say antelope tastes a little of sage, or of what the animal was eating. I can’t tell you that for sure, and it probably varies a lot from animal to animal and with how the meat was handled in the field. What I can tell you is that in my kitchen, well-handled pronghorn has tasted clean and mild, and it doesn’t need to be buried under spices.
The seasonings I reach for are the classic ones for this dish: Worcestershire sauce for savory depth, tomato paste for body and a little sweetness, thyme, a bit of rosemary, garlic, salt, and black pepper. Rosemary and game go together well. Same idea as the juniper in my Antelope Backstrap with Juniper Rub: piney, woodsy flavors seem to fit this meat.
Don’t Cook It to Death
Lean meat dries out fast, so once it’s browned and cooked through, stop. The meat gets a second round of heat in the gravy and again in the oven. The gravy protects it, but there’s no reason to make it tougher than it has to be by frying it for twenty minutes first.
Substitutions: Beef, Lamb, or Other Game
No antelope? This recipe works the same with ground beef or ground lamb (and then you really can argue about whether it’s cottage pie or shepherd’s pie). With fattier meats like 80/20 beef or most ground lamb, you can skip the bacon fat, and you may want to spoon off some extra grease after browning. Ground venison or elk work great too and need the same treatment as antelope: a little added fat, and don’t overcook it.
Building the Filling
The filling is basically a thick, savory stew. Here’s how I put it together.
Start With the Vegetables
Once the meat is browned, scoop it out and set it aside. In the same pan, cook a diced onion and a couple of diced carrots in the leftover fat until they start to soften, then add garlic for a minute. Some people add celery, and you can too. I like to keep this version simple: onion, carrot, and later some frozen peas that go in near the end so they stay green.
Tomato Paste and Flour
Next comes tomato paste. Stir it into the vegetables and let it cook for a minute or two until it darkens a little. That small step takes away the raw, tinny taste and deepens the flavor. Then sprinkle in the flour and stir it into everything for another minute. The flour is what turns your broth into gravy instead of soup.
The Gravy
Pour in the beef broth slowly, scraping the bottom of the pan as you go to lift all the browned bits. Add the Worcestershire, thyme, and rosemary, put the meat back in, and let it simmer.
This is the step people rush, and it’s the reason a lot of shepherd’s pies come out soupy. Let the filling simmer until the gravy is thick enough to coat a spoon and leave a trail when you drag it across the bottom of the pan. It should look a bit thicker than you think it needs to be. It loosens up a little in the oven, and you want each scoop to hold its shape on the plate instead of running everywhere. If it’s still thin after several minutes, keep simmering. If it gets too thick, add a splash more broth.
Stir in the peas at the end, taste, and adjust the salt and pepper. Taste it on its own. If the filling isn’t good straight out of the skillet, the potatoes won’t fix it.
The Mashed Potato Topping
The mashed potatoes aren’t just a lid. They’re half the dish, so treat them that way.
Which Potatoes
Russets make a fluffier, lighter mash that browns nicely. Yukon Golds are creamier and a little more buttery-tasting on their own. Both work. Use whichever you have, or mix them.
Cooking Them at Altitude
Peel the potatoes, cut them into even chunks, and start them in cold, salted water. Bring the pot up to a boil and simmer until a fork slides in with no resistance. Up here in Casper, at about 5,150 feet, potatoes may take a bit longer to get fork-tender than a recipe written at sea level suggests. So I go by the fork, not the clock. Drain them well and let them steam in the pot for a minute or two to dry off. Watery potatoes make a gluey, slumping topping.
Mash With Butter and Warm Milk
Mash the potatoes with butter, warm milk, and salt. Warming the milk first helps it soak in evenly and keeps the mash from cooling down. If you want, stir in a handful of sharp cheddar. It’s not traditional everywhere, but it browns beautifully on top. I’d skip anything too wet, like lots of sour cream, since you want the topping firm enough to spread and hold ridges.
About tools: a regular hand masher works fine for a rustic topping. If you want silky mash with no lumps, a potato ricer is the tool. The OXO Good Grips stainless steel potato ricer pushes cooked potatoes through small holes, which gives you smooth, fluffy mashed potatoes without overworking them into glue. (Affiliate link; I may earn a small commission if you buy, at no extra cost to you.)
Assembly and Baking
Spread the filling evenly in a 9×13-inch baking dish (or a similar 3-quart casserole). If the filling is boiling hot, let it sit for a few minutes before topping it. That way the potatoes are easier to spread and sink less.
Spoon the mashed potatoes over the top in dollops, starting at the edges and working in, then spread them together into an even layer. Getting the potatoes all the way to the sides of the dish helps seal the filling in so it doesn’t bubble over as much. Then drag a fork across the top to make ridges and peaks. This step matters. Every one of those little ridges turns golden and crispy in the oven, and that’s the crust you get to break through at the table.
Set the dish on a rimmed baking sheet to catch drips, and bake at 400°F until the filling is bubbling around the edges and the top is starting to brown, usually 20 to 25 minutes. For more color, run it under the broiler for a couple of minutes at the end. Stay right there and watch it. Broilers go from “nicely browned” to “burnt” in a hurry.
Then let it rest about 10 minutes before you serve it. I know. It smells amazing and everyone is hungry. But resting lets the gravy settle and thicken, so you get clean scoops instead of a puddle.
A Quick Word on Food Safety
For ground meat, cook to a safe temperature, not just until it looks done. USDA guidance for wild game says ground game should reach an internal temperature of 160°F, the same as ground beef. I couldn’t find an antelope-specific line from USDA, so I’m applying that wild game guidance to ground antelope: 160°F.
The easiest place to check is right in the skillet, while you’re browning the meat. Push an instant-read thermometer into a thick clump of meat. Once it’s cooked to 160°F, you’re set, and the rest of the recipe is building flavor and texture. That’s worth spelling out, because the safety temperature and the “don’t overcook it” advice are two separate things. Get it to a safe temperature, then don’t keep frying it past that point. A thermometer is how you do both.
Make-Ahead Shepherd’s Pie
This is a great make-ahead dinner. You can make the filling and potatoes, assemble the whole pie, cover it tightly, and refrigerate it up to a day before you bake it. Fork the ridges into the top before you cover it, and the next day it’s ready to go.
When you bake it straight from the fridge, plan on an extra 10 to 15 minutes or so in the oven, since you’re starting cold. Bake it covered with foil for the first part if the top is browning faster than the middle is heating, then uncover to finish. Since everything in it is already cooked, I treat this like reheating leftovers and check that the center reaches 165°F with a thermometer.
It’s also a good one to make on a Sunday and eat through the week. Which brings us to leftovers.
Storage & Reheating
The USDA Food Safety and Inspection Service has clear guidance for leftovers, and it applies here:
- Refrigerate promptly. Get leftovers into the fridge within 2 hours of coming out of the oven, or within 1 hour if it’s above 90°F where you are. Splitting a big pan into smaller, shallow containers helps it cool faster.
- Fridge: Leftovers keep 3 to 4 days in the refrigerator.
- Freezer: For best quality, eat frozen leftovers within 3 to 4 months. (Frozen food stays safe longer than that, but the texture and flavor start to slip.)
- Reheat to 165°F. Whether you use the oven or the microwave, reheat leftovers until they reach 165°F in the center.
For reheating, I like the oven for bigger portions: put it in a baking dish, cover it with foil so the potatoes don’t dry out, and heat at about 350°F until it’s hot all the way through. Take the foil off for the last few minutes if you want the top to crisp up again. For a single serving, the microwave is fine. Cover it, and stir the filling partway through if you can, since microwaves heat unevenly.
If you freeze it, thaw it in the fridge overnight before reheating. Peas and potatoes can get a little softer after freezing, but in a dish like this it hardly matters.
Serving Ideas
Shepherd’s pie is a full meal, so it doesn’t need much on the side. A simple green salad with a sharp vinaigrette cuts through the richness. Crusty bread for the gravy never hurts. If you’re feeding a crowd and want two pots going, it sits nicely next to a bowl of Green Chile Pork Stew. And if you’ve still got antelope left after this, I have a Pronghorn Jerky recipe too.
Antelope Shepherd’s Pie
Ground antelope in a thick, savory gravy with carrots, onion, and peas, topped with buttery mashed potatoes and baked until golden.
Prep time: 25 minutes
Cook time: 1 hour (includes 10-minute rest)
Total time: 1 hour 25 minutes
Servings: 6
Ingredients
For the mashed potato topping:
- 2 lb russet or Yukon Gold potatoes, peeled and cut into 2-inch chunks
- 1 tablespoon kosher salt, for the cooking water
- 4 tablespoons unsalted butter
- 1/2 cup whole milk, warmed (plus more as needed)
- 1/2 teaspoon kosher salt, plus more to taste
- 1 cup shredded sharp cheddar cheese (optional)
For the filling:
- 2 tablespoons bacon fat or neutral oil, divided
- 2 lb ground antelope (pronghorn), or ground beef or lamb (see note)
- 1 1/2 teaspoons kosher salt, divided
- 1/2 teaspoon black pepper
- 1 medium yellow onion, diced
- 2 medium carrots, peeled and diced
- 3 cloves garlic, minced
- 2 tablespoons tomato paste
- 2 tablespoons all-purpose flour
- 1 1/2 cups beef broth
- 1 tablespoon Worcestershire sauce
- 1 teaspoon dried thyme
- 1/2 teaspoon dried rosemary, crumbled
- 1 cup frozen peas
Instructions
- Start the potatoes. Put the potatoes in a large pot, cover with cold water by about an inch, and add 1 tablespoon salt. Bring to a boil, then simmer until a fork slides in easily, about 15 to 20 minutes (it can take a bit longer at altitude, so test with a fork). Heat the oven to 400°F while they cook.
- Brown the meat. While the potatoes cook, heat 1 tablespoon of the bacon fat in a large, heavy skillet over medium-high heat. Add the ground antelope in batches if needed, season with 1 teaspoon of the salt and the pepper, and cook, breaking it up, until browned and an instant-read thermometer reads 160°F, about 6 to 8 minutes. Transfer the meat to a bowl.
- Cook the vegetables. Lower the heat to medium and add the remaining 1 tablespoon bacon fat to the skillet. Add the onion and carrots and cook, stirring, until softened, about 5 to 6 minutes. Add the garlic and cook 1 minute more.
- Add tomato paste and flour. Stir in the tomato paste and cook 1 to 2 minutes until it darkens slightly. Sprinkle in the flour and stir constantly for 1 minute.
- Make the gravy. Slowly pour in the beef broth, stirring and scraping up the browned bits. Add the Worcestershire sauce, thyme, and rosemary. Return the meat and any juices to the skillet.
- Thicken the filling. Simmer, stirring occasionally, until the gravy is thick enough to coat a spoon and leave a trail across the bottom of the pan, about 5 to 8 minutes. Add a splash more broth if it gets too thick. Stir in the peas, then taste and add the remaining 1/2 teaspoon salt or more as needed. Remove from the heat.
- Mash the potatoes. Drain the potatoes well and return them to the warm pot for 1 to 2 minutes to steam dry. Mash (or press through a ricer) with the butter, warm milk, and 1/2 teaspoon salt until smooth. Stir in the cheddar, if using. Add a little more milk if the mash is too stiff to spread, but keep it fairly thick.
- Assemble. Spread the filling evenly in a 9×13-inch (3-quart) baking dish. Spoon the mashed potatoes over the top, starting at the edges, then spread them into an even layer all the way to the sides. Drag a fork across the surface to make ridges.
- Bake. Set the dish on a rimmed baking sheet and bake until the filling is bubbling at the edges and the top is lightly golden, 20 to 25 minutes. For a browner top, broil 2 to 3 minutes, watching closely.
- Rest and serve. Let the shepherd’s pie rest 10 minutes before serving so the gravy can settle.
Notes
- Substitutions: Ground beef, ground lamb, ground venison, or ground elk all work. With fattier beef or lamb, you can skip the bacon fat and spoon off excess grease after browning.
- Extra-lean grind: If your antelope is very lean, you can replace up to 1/2 lb of it with ground pork for a richer filling.
- Make ahead: Assemble, cover tightly, and refrigerate up to 1 day. Bake from cold, adding about 10 to 15 minutes, until bubbling and the center reaches 165°F.
- Storage: Refrigerate leftovers within 2 hours for up to 3 to 4 days, or freeze for best quality up to 3 to 4 months. Reheat, covered, to 165°F.
That’s it: lean Wyoming game, a real gravy, and a potato crust you have to break through to get to it. If you make this, I’d love to see how yours turns out. Tag @wyofood on Instagram or find Wyo Food on Facebook and tell me what you put in yours. Cheddar or no cheddar? Celery or no celery? Antelope, elk, or the beef from the store? I want to know.
— Sean